
In June 2018, Google launched its Google My Business Agency Dashboard, which allows one account to manage multiple businesses with unlimited locations. While the dashboard was targeted toward agencies, it’s also helpful for enterprises that manage multiple locations around the world.
If you’re new to the platform, check out these actionable solutions to 6 problems that sometimes occur in Google My Business Agency accounts with multiple locations.
Before we start, let’s get on the same page for two terminologies:
- “Location” refers to each item or business in the Manage Locations listing on Google My Business.
- “Location Group” refers to a consolidation of several locations that share an owner or manager.
OK. Let’s dive in!
1. Duplicate Location: Two locations sharing the same address are marked as duplicate
If one of your locations is marked as a duplicate of another location, you will see a Duplicate status on the Manage Locations list.
The below image shows the Manage Locations tab on the Google My Business dashboard. The location with Duplicate status is highlighted with a red box.
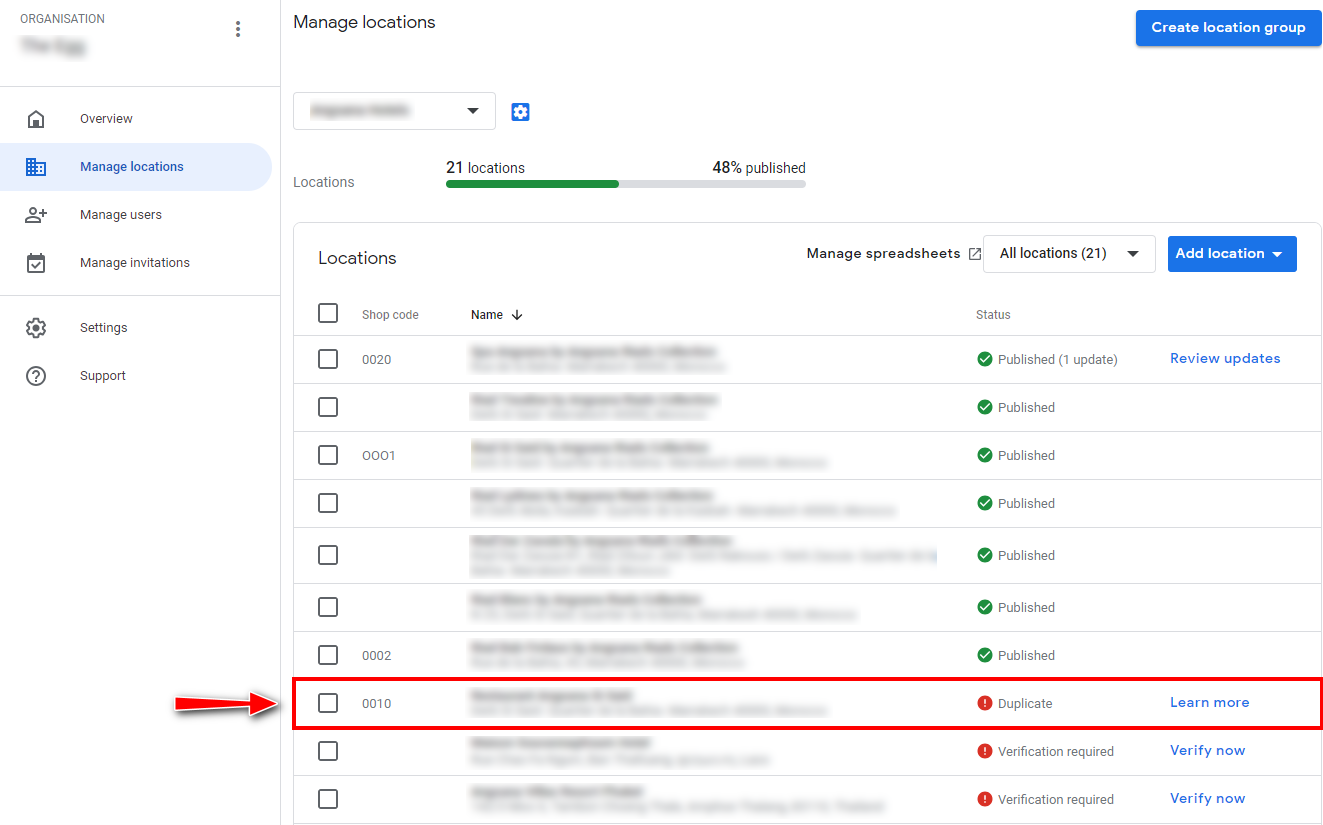 Duplicate Status on Manage Locations List
When you click on the location, Google My Business takes you to the location’s Home tab, where you will see the Duplicate location message again.
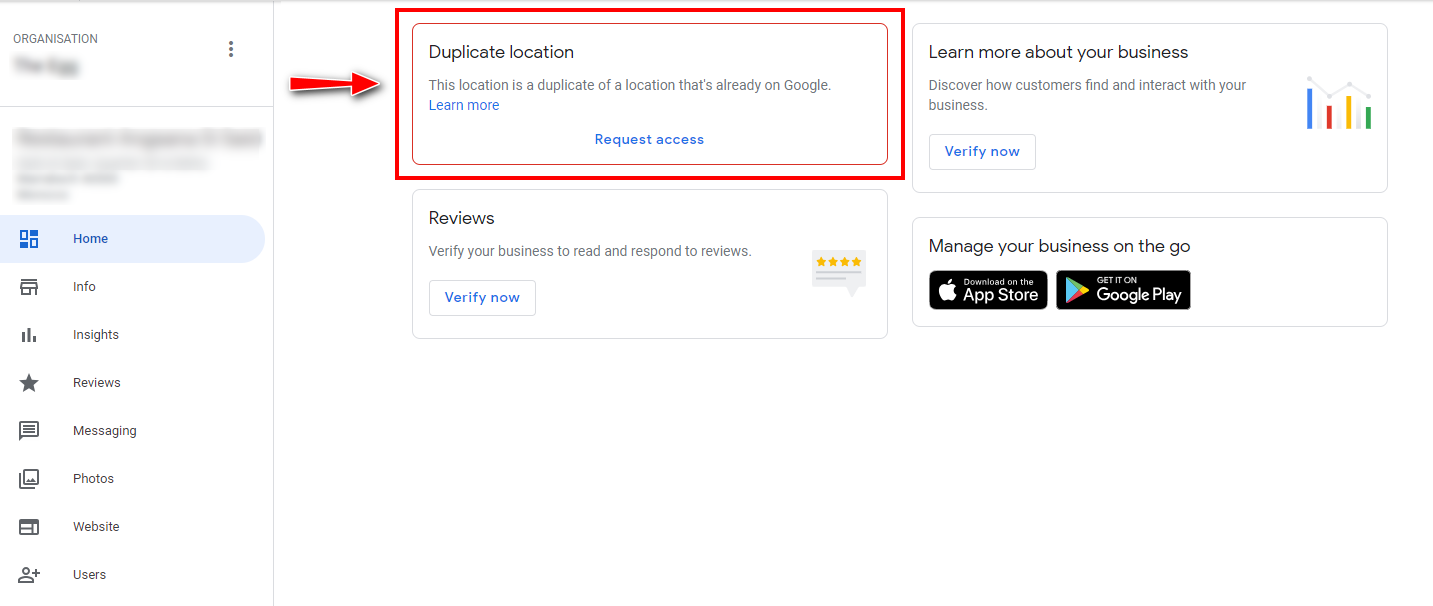
Duplicate Location Status on Home Tab
Under the Home tab is the Info tab. Clicking the Info tab will take you to your location’s information page where you will see the Duplicate location warning as highlighted below.
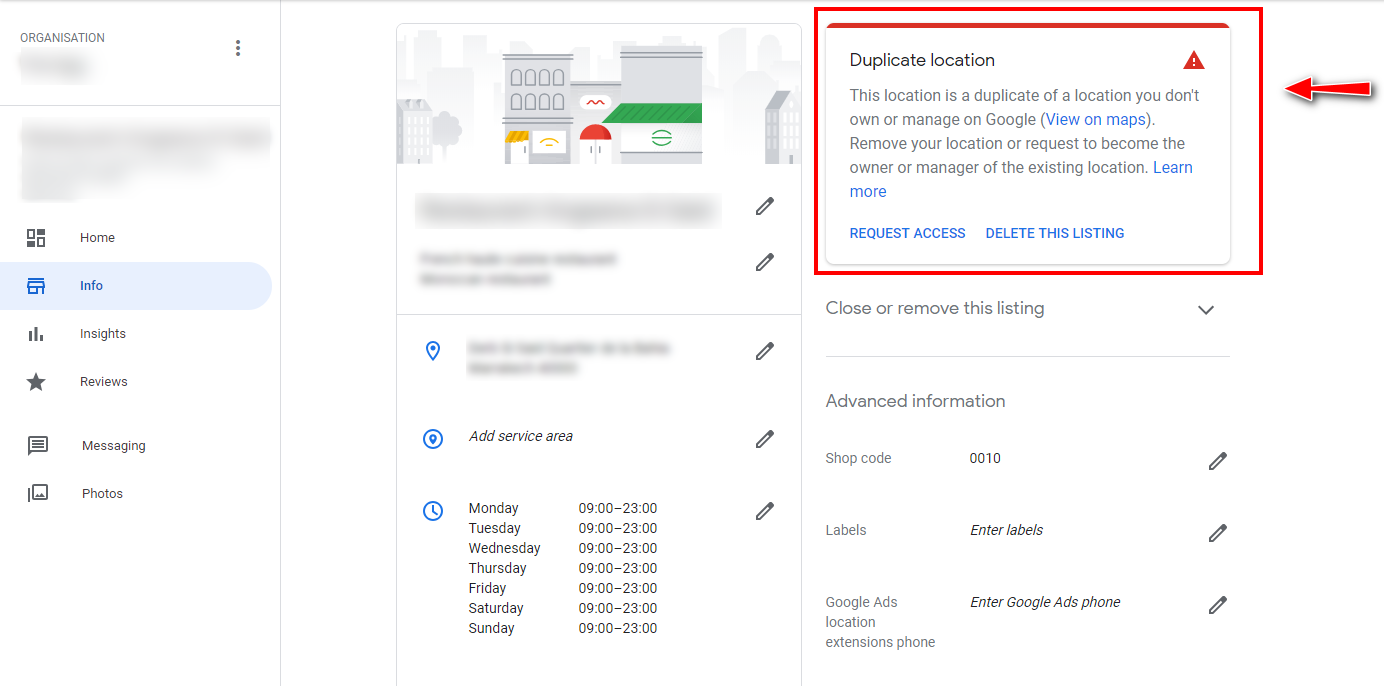
Duplicate Location Status on Info Tab
When facing this problem, you cannot verify the business marked as duplicate, which also means you cannot publish any changes to that location’s information.
How to Fix the Issue
Ultimately, you want to provide as much proof that the two locations represent two different business listings.
- The first method is by adding a unique phone number, website link, and shop code to the location that is marked as Duplicate. You can input this information in the location’s Info page as indicated in the image below.
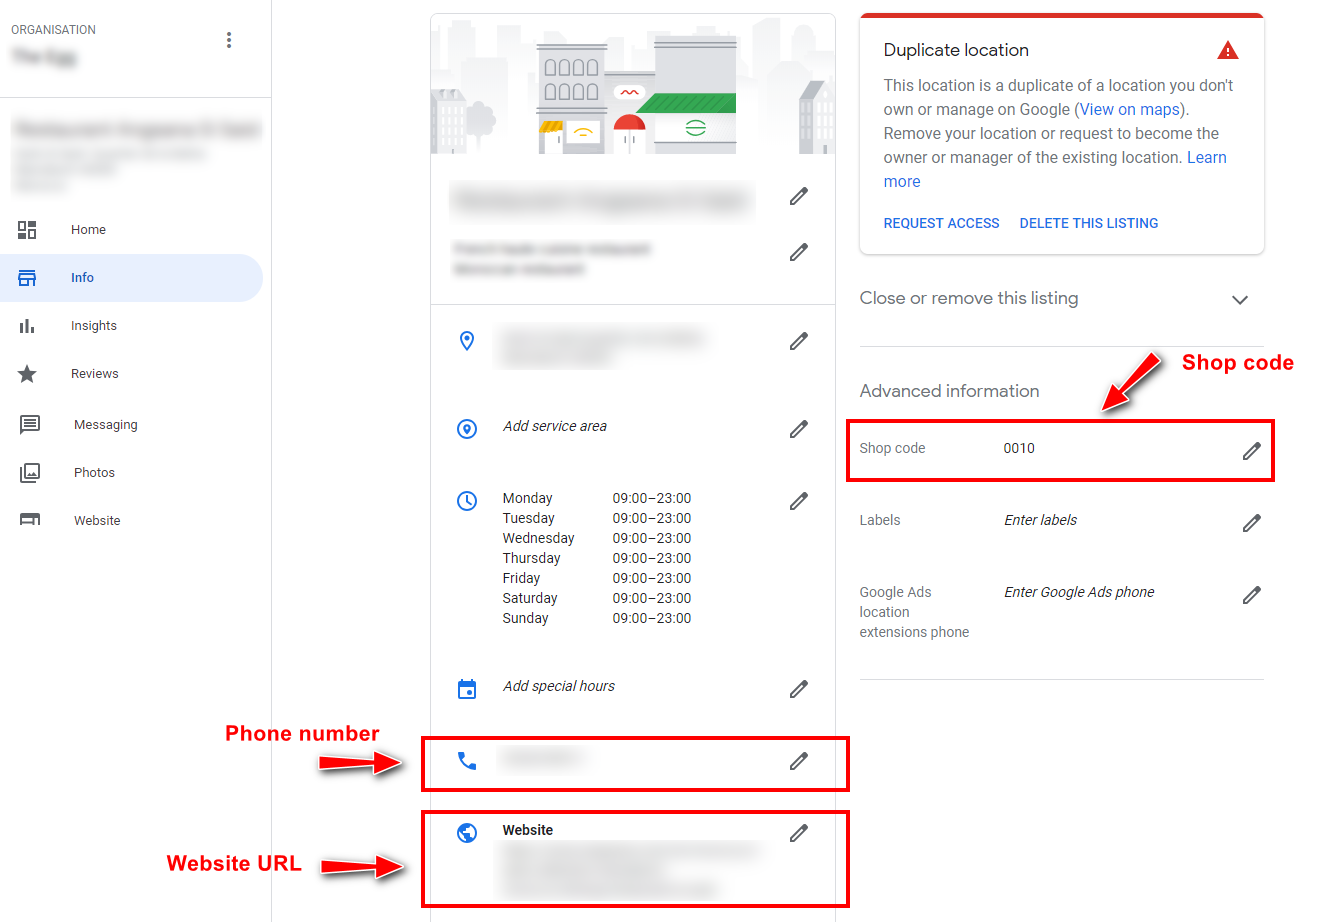
Inserting Phone Number, Website URL, and Shop Code on the Location’s Info Page
Alternatively,
- Contact Google’s official representative through Talk to a Specialist to request removal of the Duplicate Include a photo of your business’ facade or signage as proof that you have two unique business listings rather than one as a duplicate of the other.
2. Google Maps Duplicate: One location appears twice on Google Maps
Let’s say that one of the business listings that you manage on Google My Business is shown in Google Maps at two separate locations with the same name. But you want to combine them to aggregate reviews from both locations.
In the image below, we have recreated the situation whereby a business named Business ABC appears at two different addresses in Google Maps.
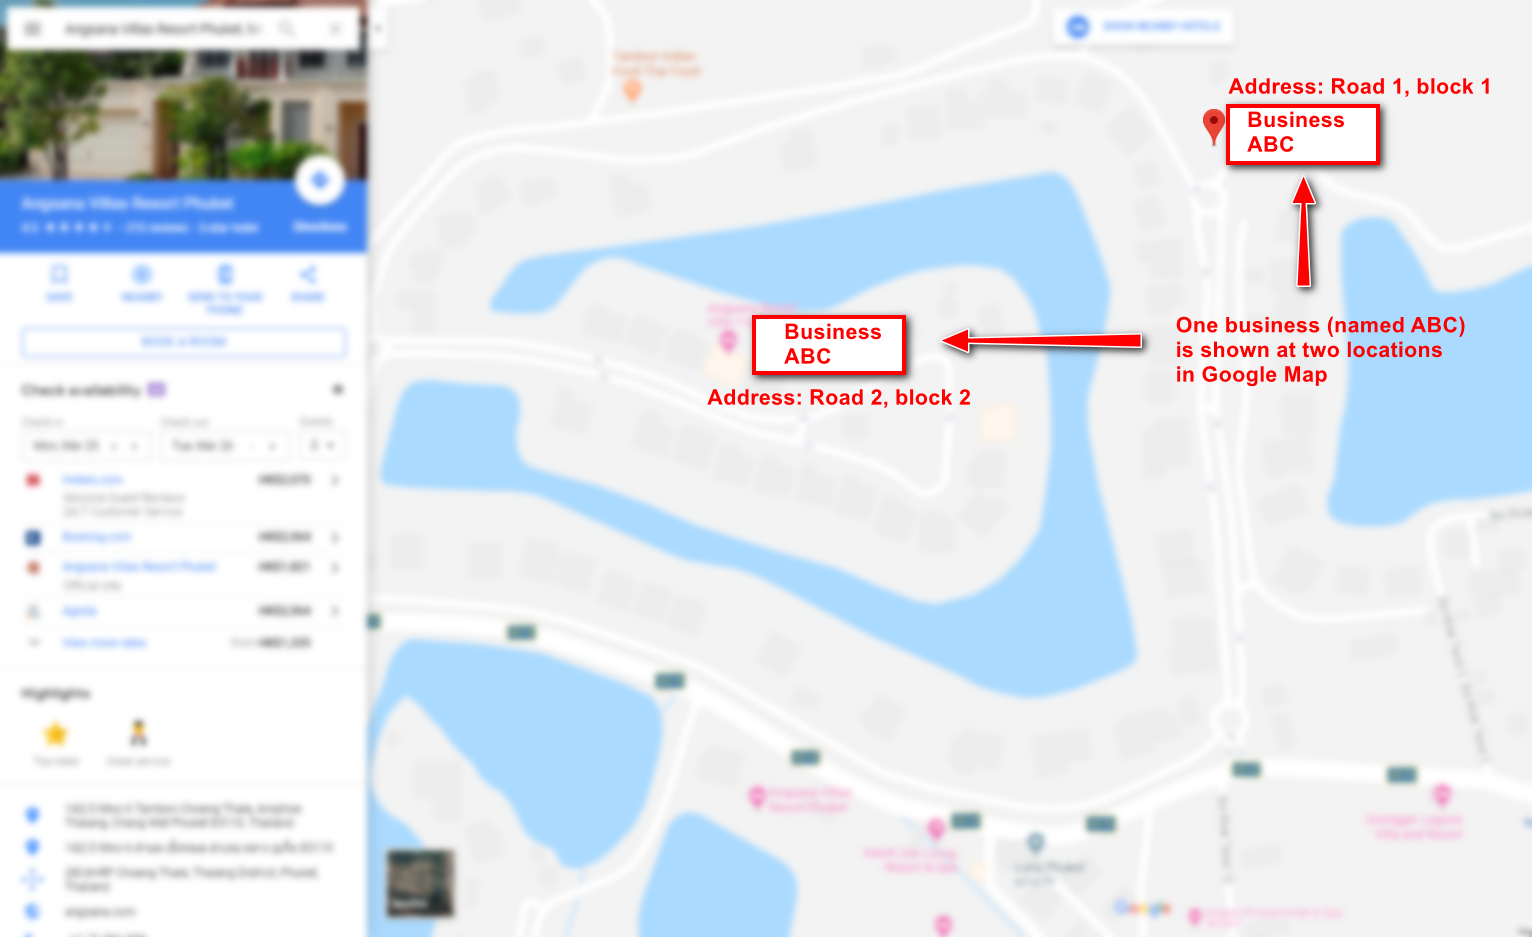
One Business Displayed in Two Google Maps Locations
How to Fix the Issue
Essentially, you’ll need to suggest an edit to one of the locations to mark it as duplicate on Google Maps.
- Identify which location on Google Maps you are currently managing on Google My Business. You can do this by accessing Google Maps while logging in to the Google Account that you use in Google My Business. The location that you manage will have a line saying “You manage this Business Profile.” Let’s say this is Business ABC on Road 1, Block 1.
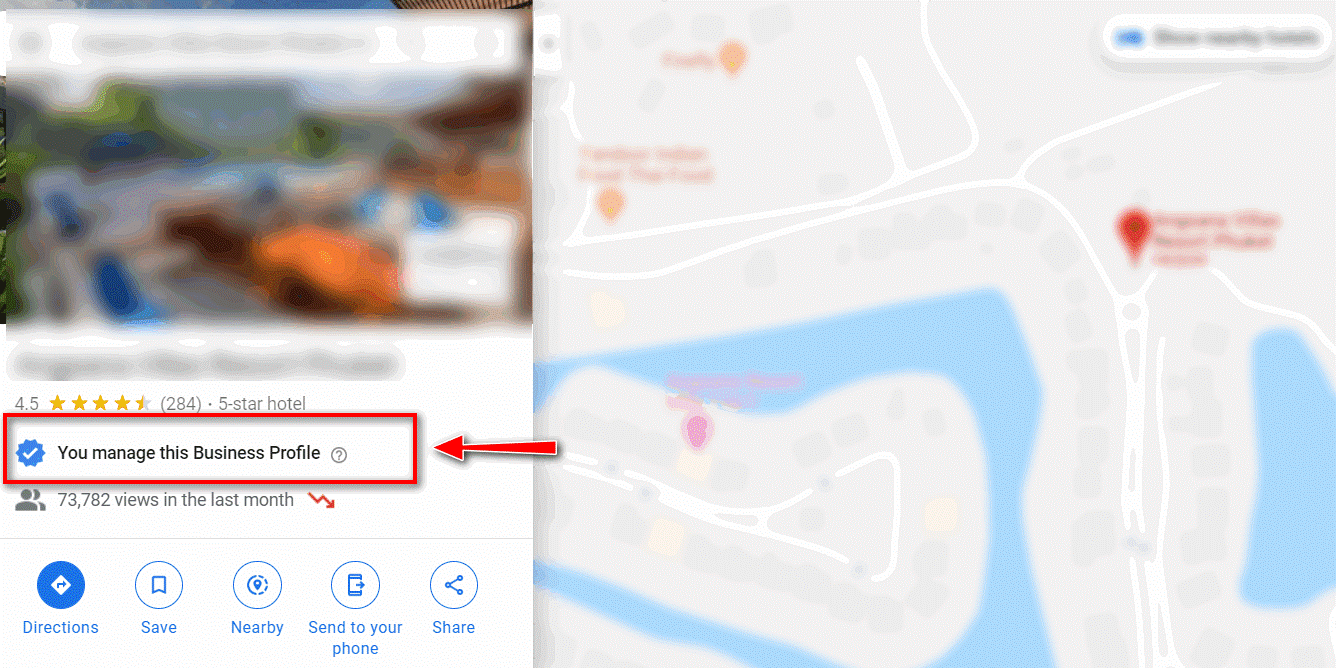
Identifying a Business That you Manage on Google Maps
- Choose the location that you want to mark as duplicate. In this example, this is the Business ABC on Road 2, Block 2. Click on this location pin on Google Maps.
- On the left side navigation on Google Maps, click Suggest an Edit.
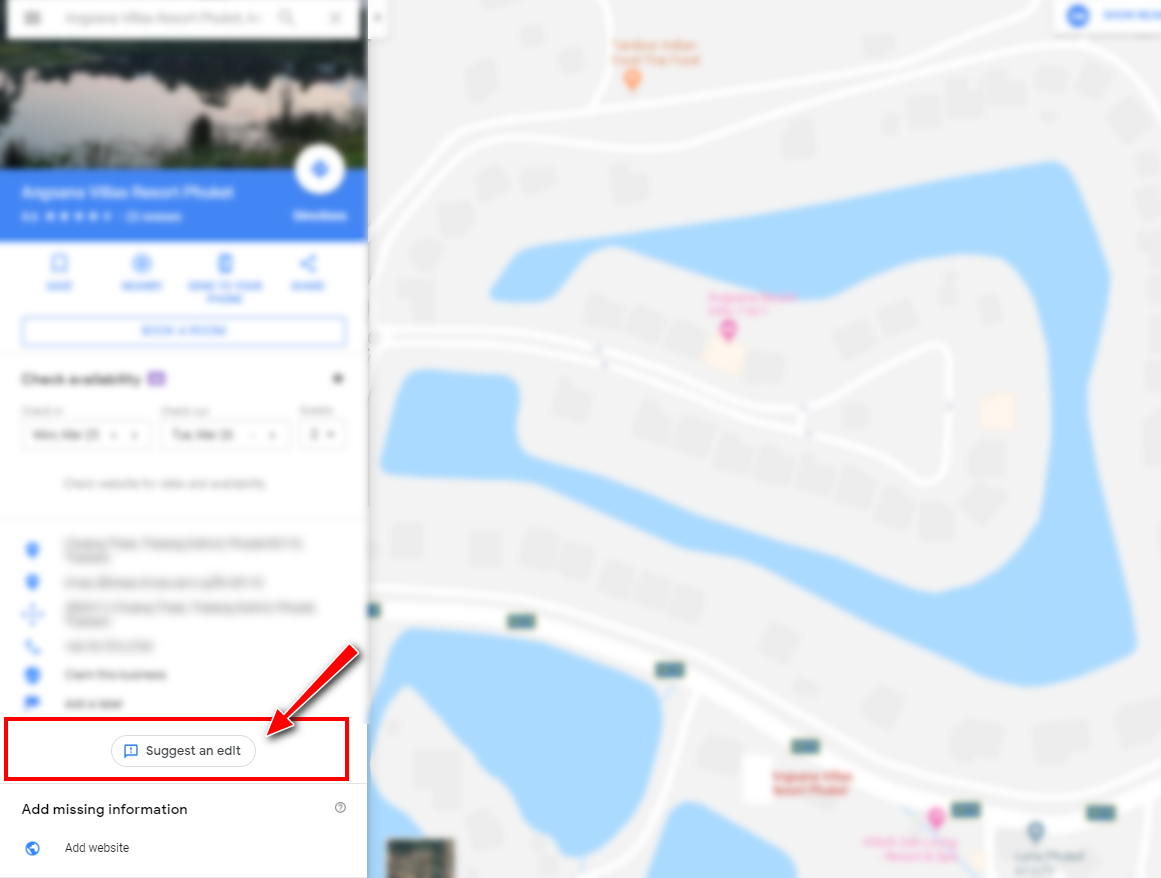
Suggest an Edit to a Google Maps Location
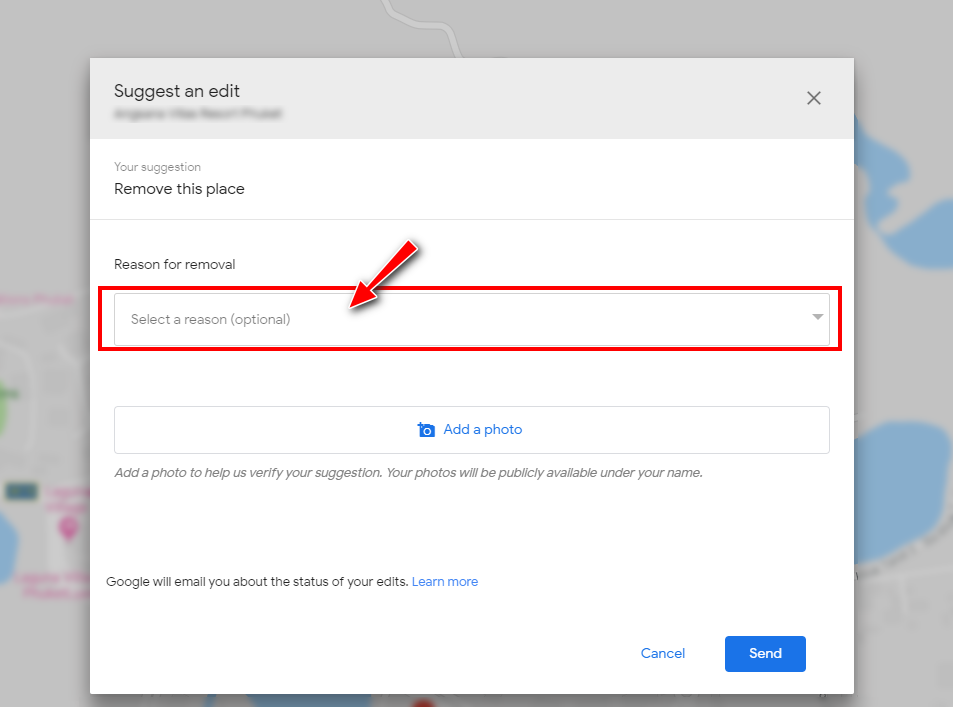
- A dialog box will pop up. Click on Remove this place: Mark as closed, non-existent, or duplicate.
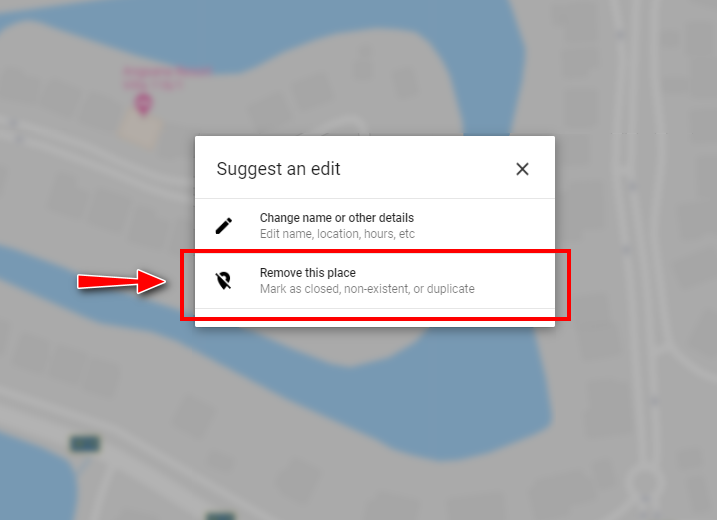
Suggest an Edit: Remove this Place
- Click on Reason for removal.
Suggest an Edit: Reason for Removal
- A drop-down menu will appear. Choose Duplicate of another place.
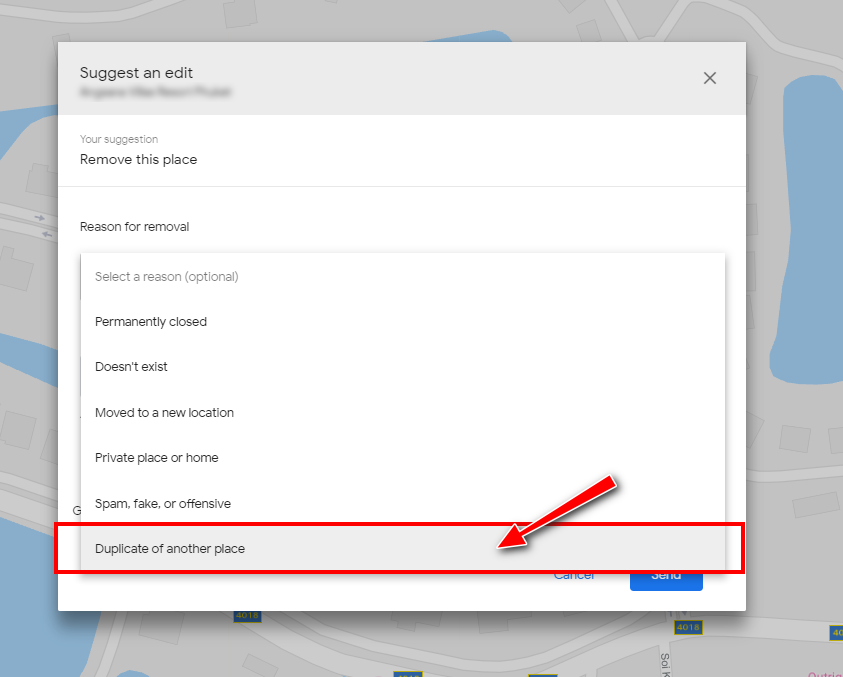
Suggest an Edit: Duplicate of Another Place
- Another dialog box will pop up asking you to choose the duplicate. Choose the location that you are managing: Business ABC on Road 1, Block 1.
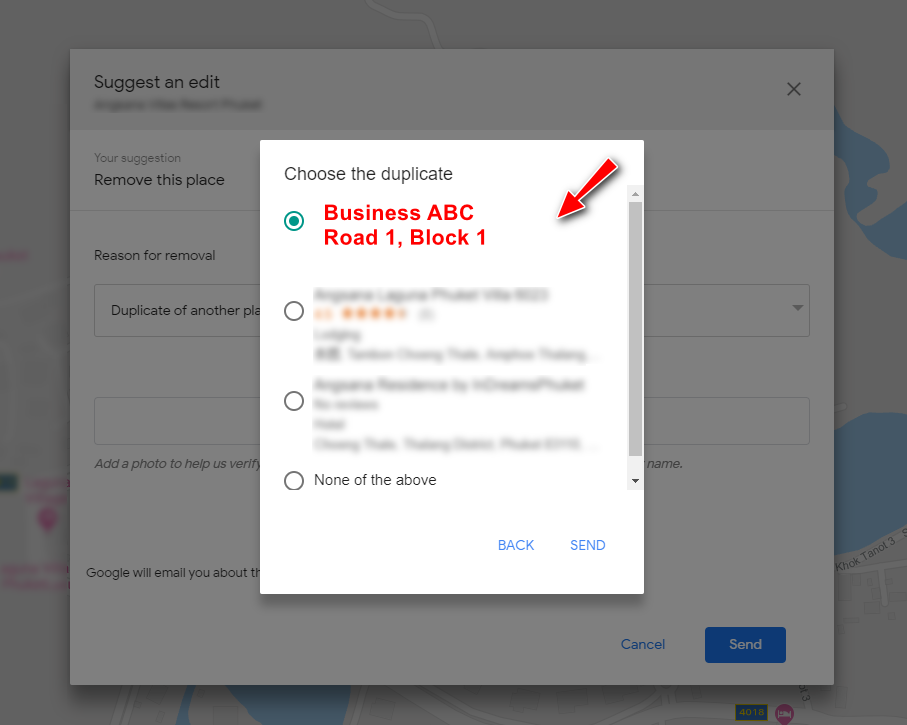
Choosing the Duplicated Location
- Google will merge the reviews and photos of the location you marked as duplicate in step 2 to the location you selected in step 7 as they both have the same name. You can also provide photo proof of your business façade, signage, and interior as an extra measure.
- Google will review the information that you provide and email you once a change has been made. From our experience, this typically takes 2-3 weeks. Occasionally, you may have a few cases with no resolution from Google.
3. Managing Invites: You cannot accept a local branch invitation to manage a location
As an enterprise with multiple locations, you may have asked your local branch(es) to add you as a manager of their location on Google My Business. However, when the local location owner sends an invitation to manage their location to your Google My Business email, you cannot accept the invitation.
Clicking the email invite takes you to the page on the image below, where clicking Accept prompts the following message:
“You aren’t eligible to be a member of an organization or user group. To associate your account with an organization, any locations, or location groups directly owned by your account must first be removed or transferred”.
The message pops up on the bottom left of your browser page, like this:
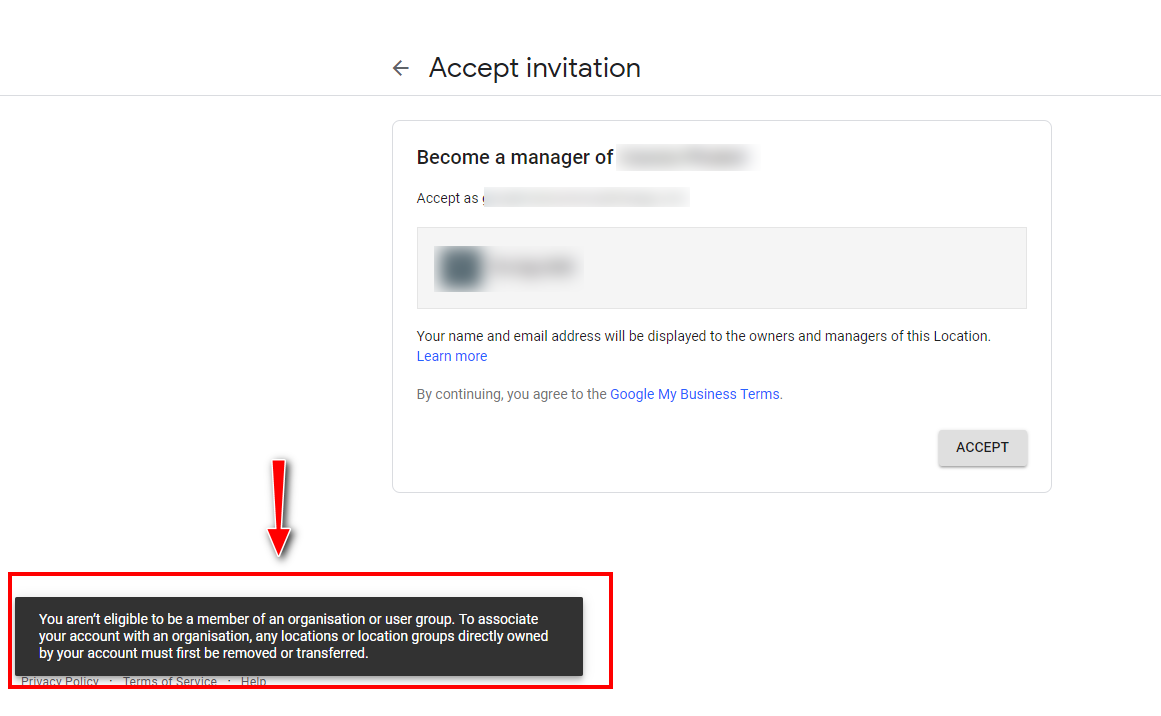
Not Eligible to Manage a Location
How to Fix the Issue
In short, ask your local branch to add your Location Group ID, not your email address, as a user.
- Go to your Manage Locations page in the Google My Business dashboard.
- Open the Location Group that you want to use.
- See the Location Group’s detail by clicking the gear icon.
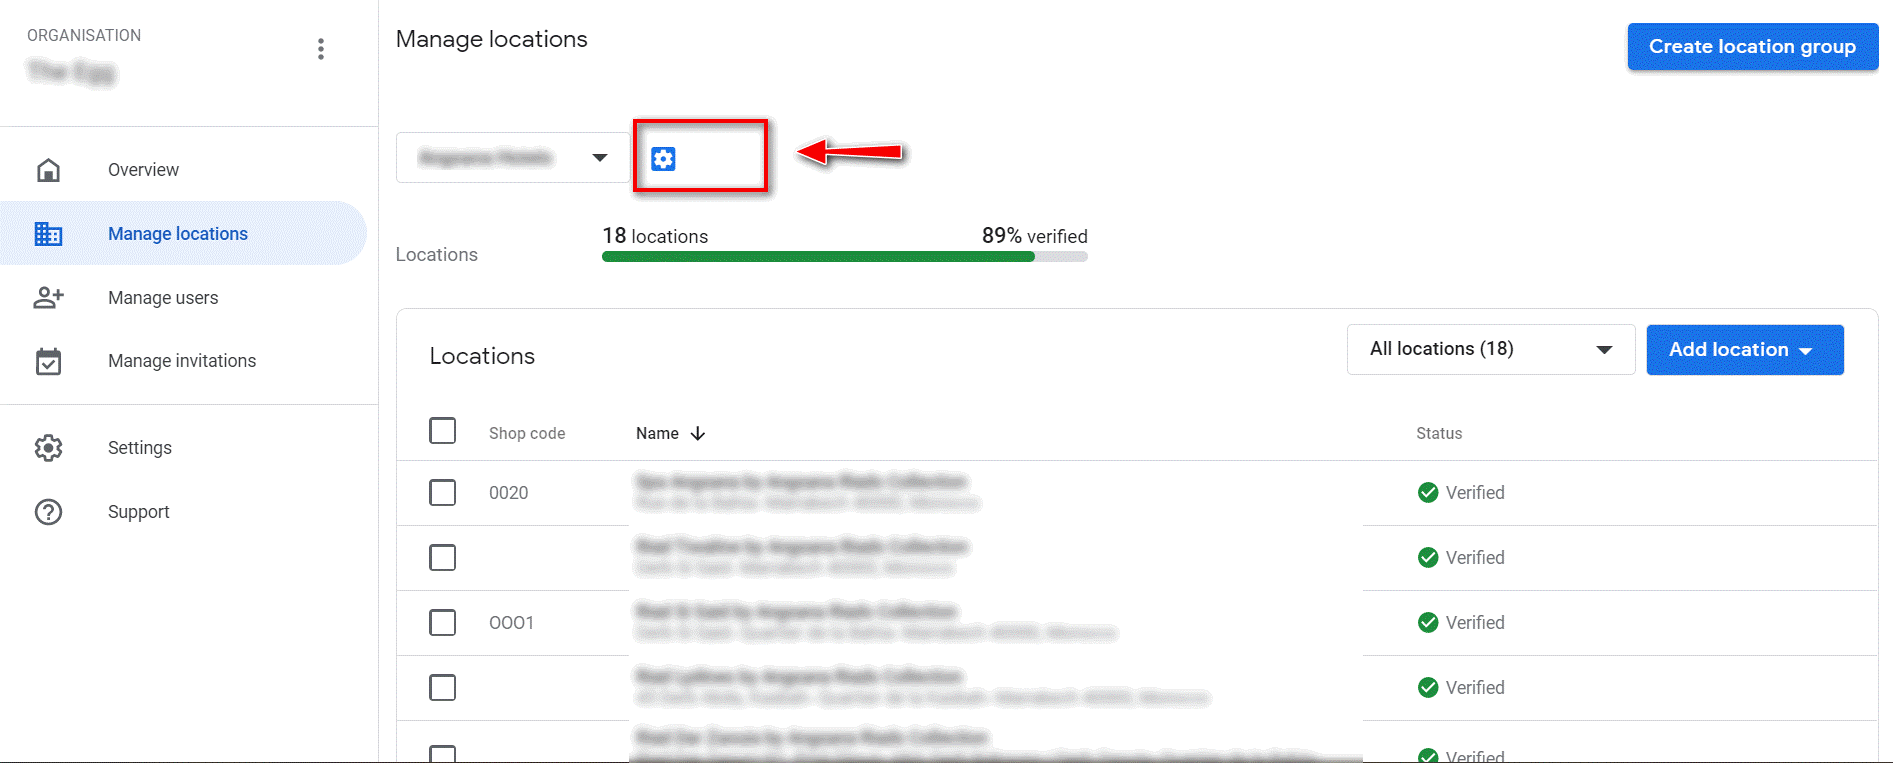
Location Group
- Copy the Location Group ID and send it to your local branch.
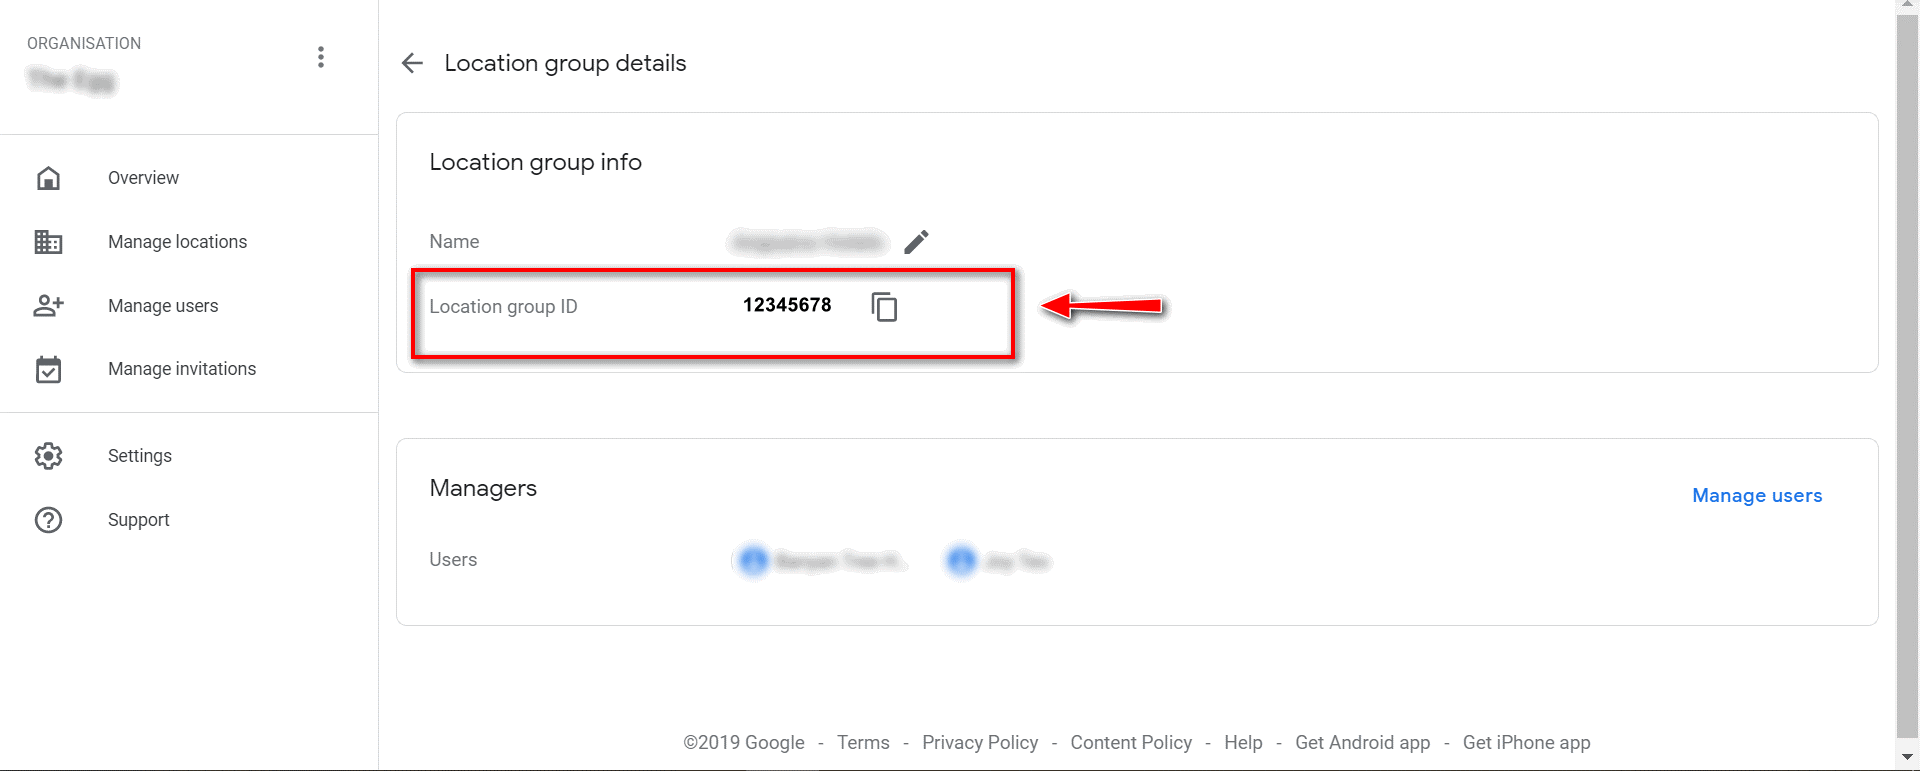
Locating a Location Group ID
- The following steps are for your local branch to do. They will need to go to their Location page and click on the User
- This time around, instead of adding your email address, they need to add your Location Group ID. It will look like this:
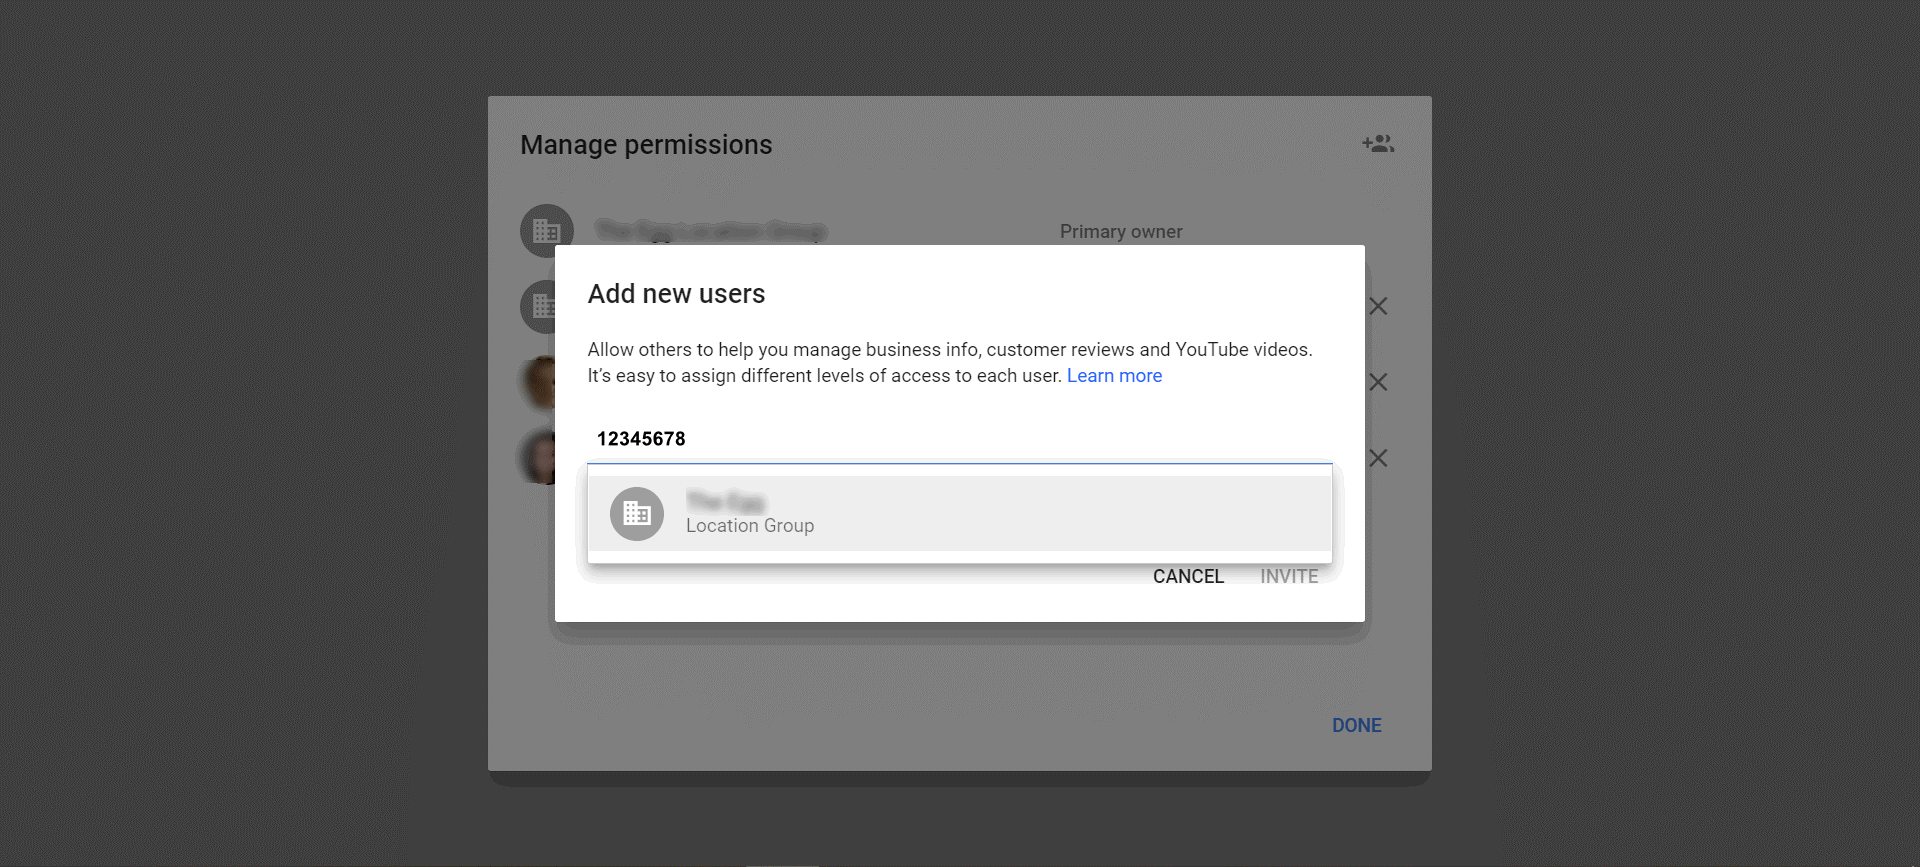
Adding a Location Group ID as a Location’s User
- Once step 6 is done, you’ll receive a user invitation on your dashboard’s Manage Invitation Accept the invitation, and you’ve now got access!
4. Access Denied: You no longer have access to a verified location
People come and go in a company. Sometimes, this means a location’s login details in Google My Business are not handed over properly. If you’re trying to get user access to such a location, here’s what you can do.
How to Fix the Issue
The goal is to override the location verification and re-verify.
- As you cannot gain access to the location, you have an option to override the location verification instead. Firstly, send an Access Request to the location. Seven days after sending the request, if an owner has not responded to it, Google My Business allows you to proceed with verification using your agency account. This allows you to reverify and take over the ownership of a location.
Important to know before you proceed with the following steps: reverifying a claimed location means any reply to the reviews done by the original owner before re-verification will be automatically removed by Google.
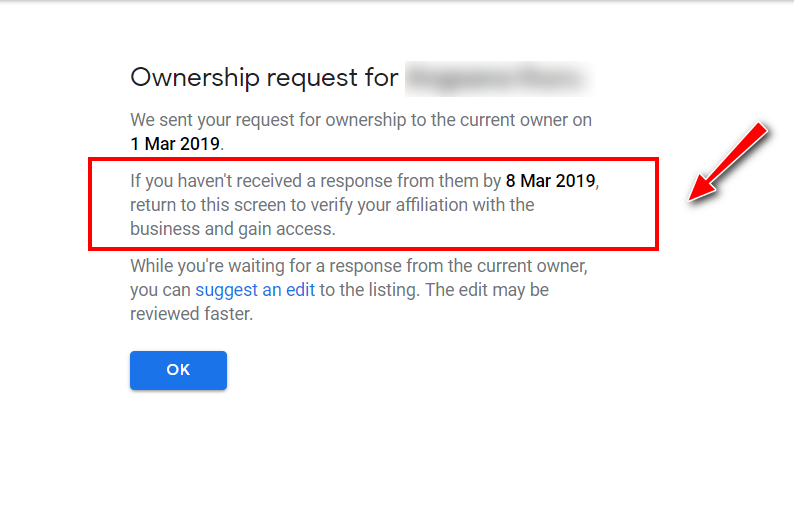
Google Allows you to Verify a Location 7 days after no Access Request Response
- After you send an Access Request, while awaiting response, you may have seen the location listed on the Manage Locations tab in your dashboard.
- While waiting, add your local branch as the location’s user. You can add a user to a location by going to your location’s User tab.
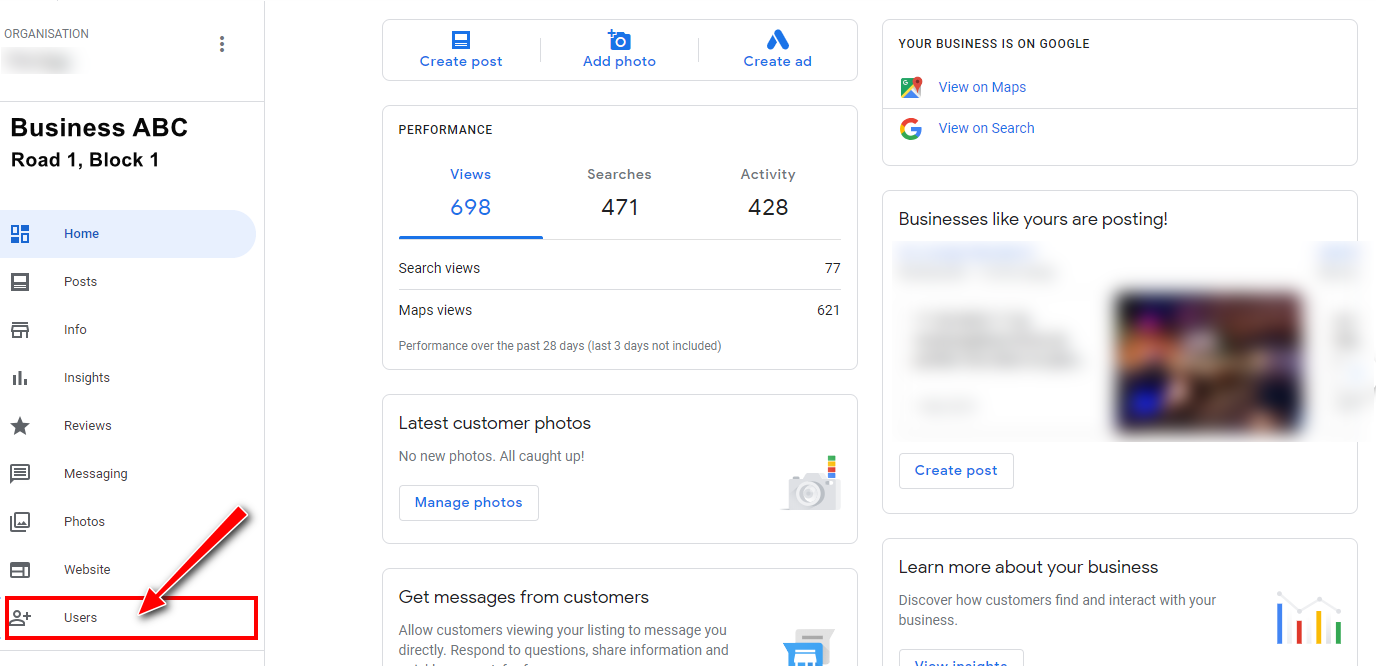
User tab on Google My Business Location
- When you click the Users tab, a Manage Permissions dialog box will pop up. Click the user icon to add a user. The icon appears on the top-right corner of the popup dialog, as indicated in the image below.
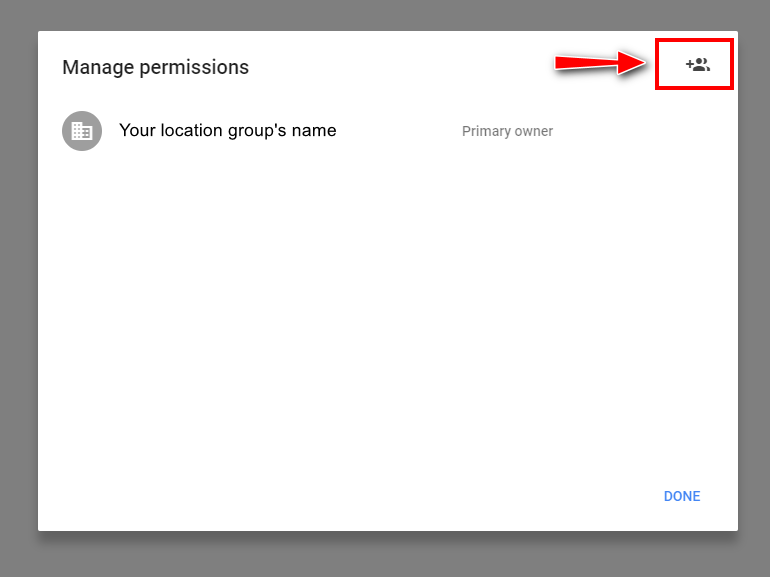
Manage Permissions: Add a User
- After that, click Invite new users.
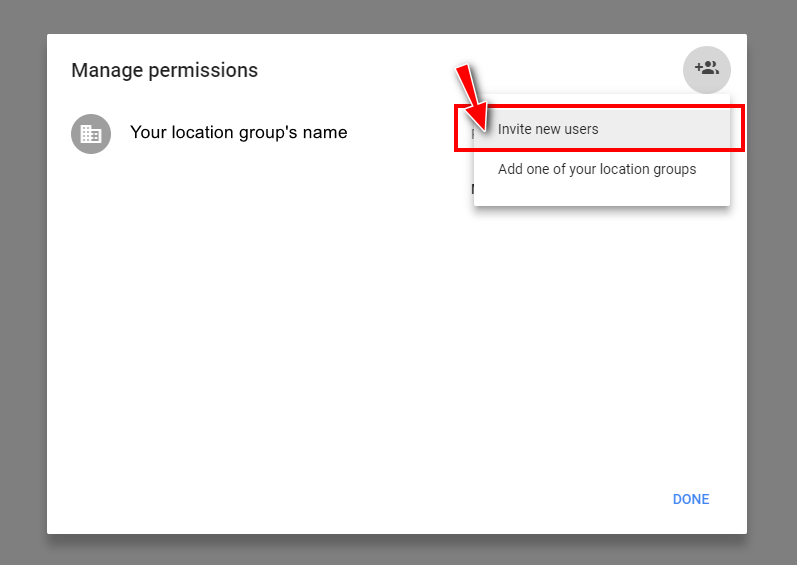
Manage Permissions: Invite New User
- Add your local branch’s email address as the new user and choose Owner as the role.
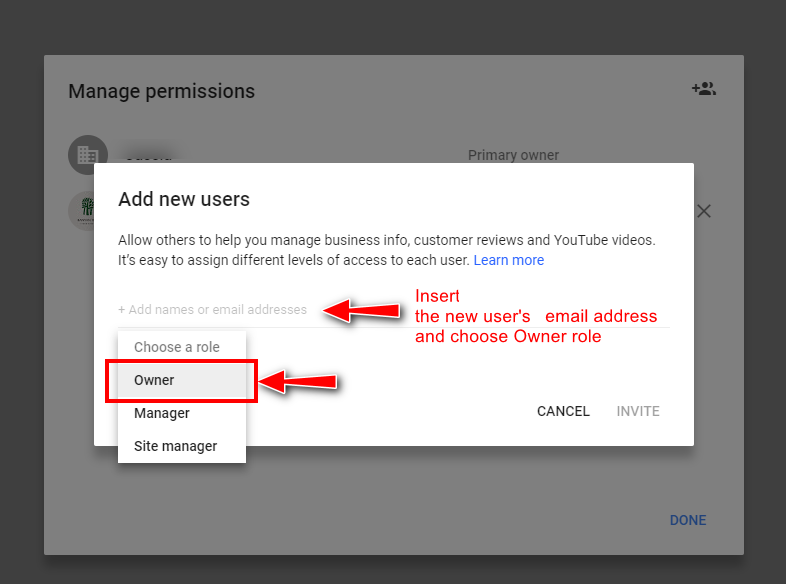
Manage Permissions: Add a New User as Owner
- The permission status for the owner will be Invited, Owner, as shown in the image below.
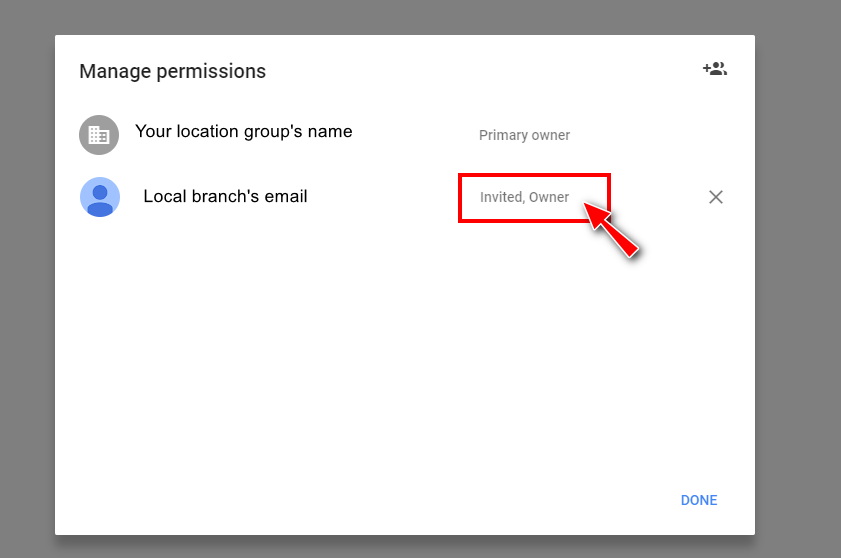
Manage Permissions: Invite Owner as User
- Once the location’s owner has accepted the invitation, the person’s user status will become Owner in Google My Business.
 Manage Permissions: A User with Owner Role
- Seven days after you get no response to your Access Request, click Verify Now.
The below image shows where you can proceed to verification with a sample location: Business ABC.

Verify Button on the Manage Locations Tab
- Based on the verification method that Google offers, proceed with your preferred method.
- Complete the verification to reclaim the location.
5. Mismatched Review Number: You cannot see all your reviews in Google My Business
So, what if you can only see some of the reviews that appear on the Google Knowledge Panel in your Google My Business dashboard? Essentially, what if when you look at the Google Knowledge Panel—that is the box that displays business information on the right-hand side of the search result—the number of reviews does not match with the number of reviews in Google My Business?
There is a limitation in Google My Business that disallows you from seeing all the reviews in the dashboard. Here, we give a workaround.
Let’s use the image below as an example. You can see 100 total reviews in your location’s Review Tab on Google My Business.
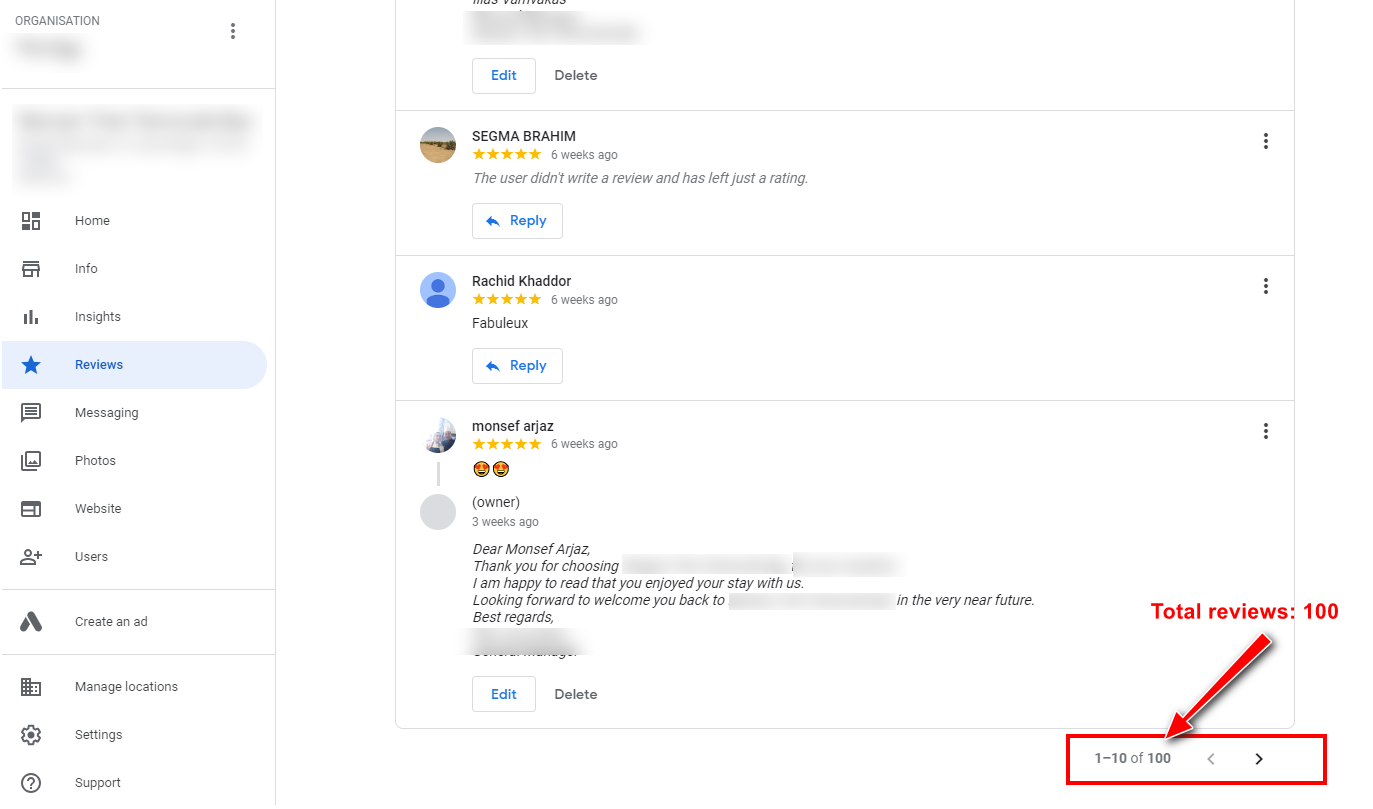
Total Reviews in Google My Business Dashboard
However, when you look at the Google Knowledge Panel, you can see a total of 233 reviews.
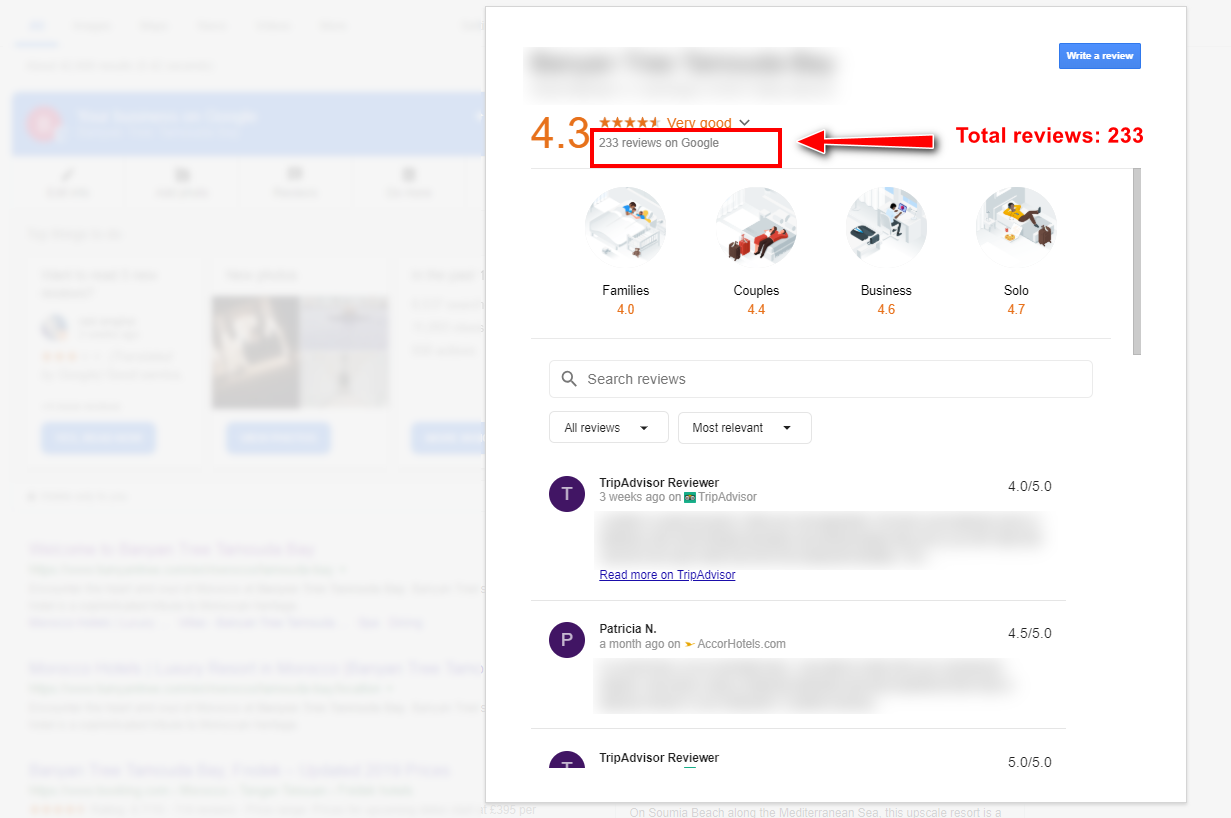
Total Reviews in the Google Knowledge Panel
If you want to respond to all of your Google reviews, here is how you can do it working around Google My Business’ limitation.
How to Fix the Issue
You can reply to all reviews through the Google Knowledge Panel on the Google search result.
- Sign in to your Google account using the email that you use for Google My Business.
- Search for your business name on Google. When the business shows up on the Google Knowledge Panel, click on the number of Google reviews in the Google Knowledge Panel.
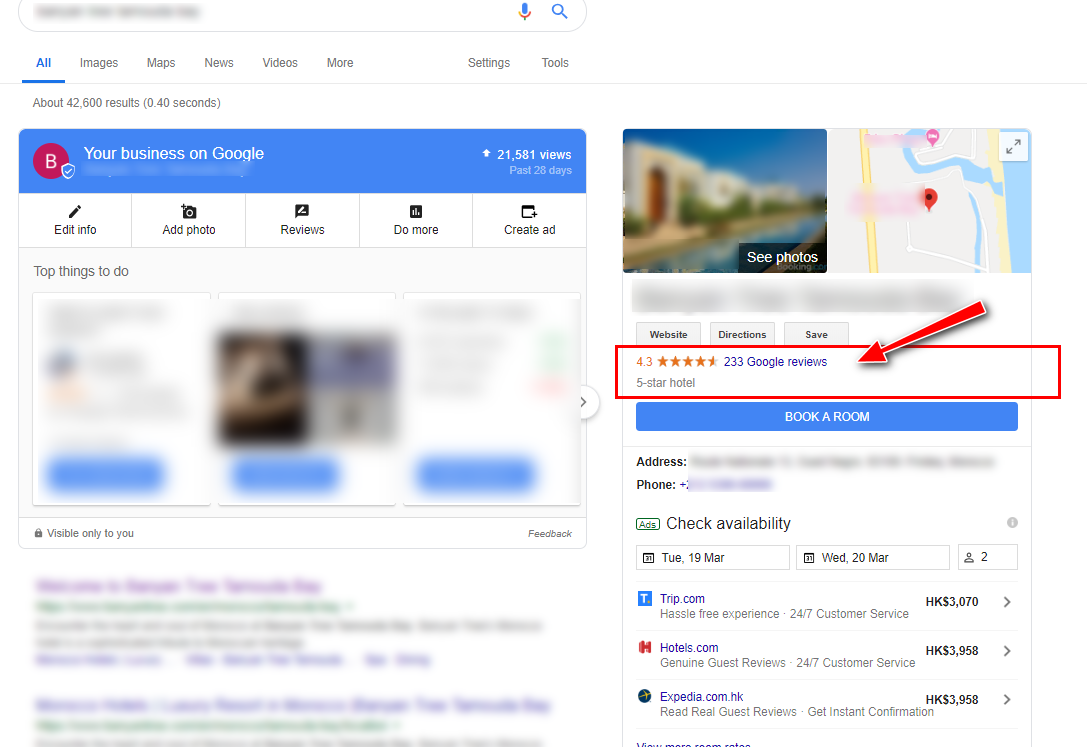
Reviews on the Knowledge Panel
- Filter the reviews to only include Google reviews. To reply to reviews from third-party websites, you need to visit those sites individually.
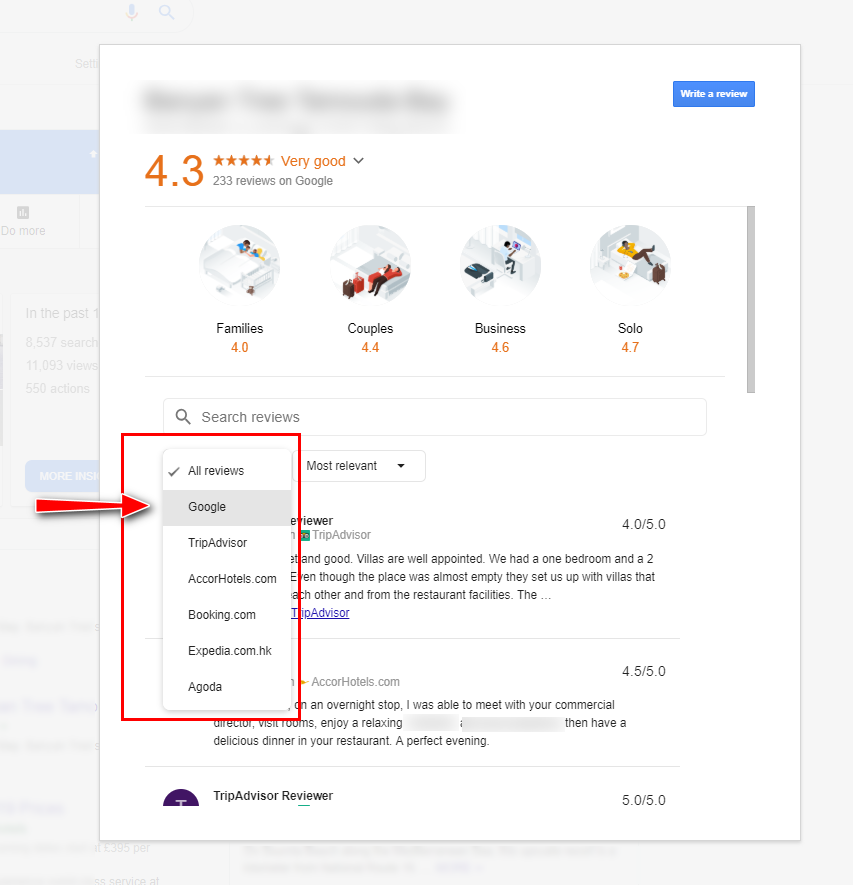
Review Filter
- After you filter out non-Google reviews, click reply to respond to each Google review.
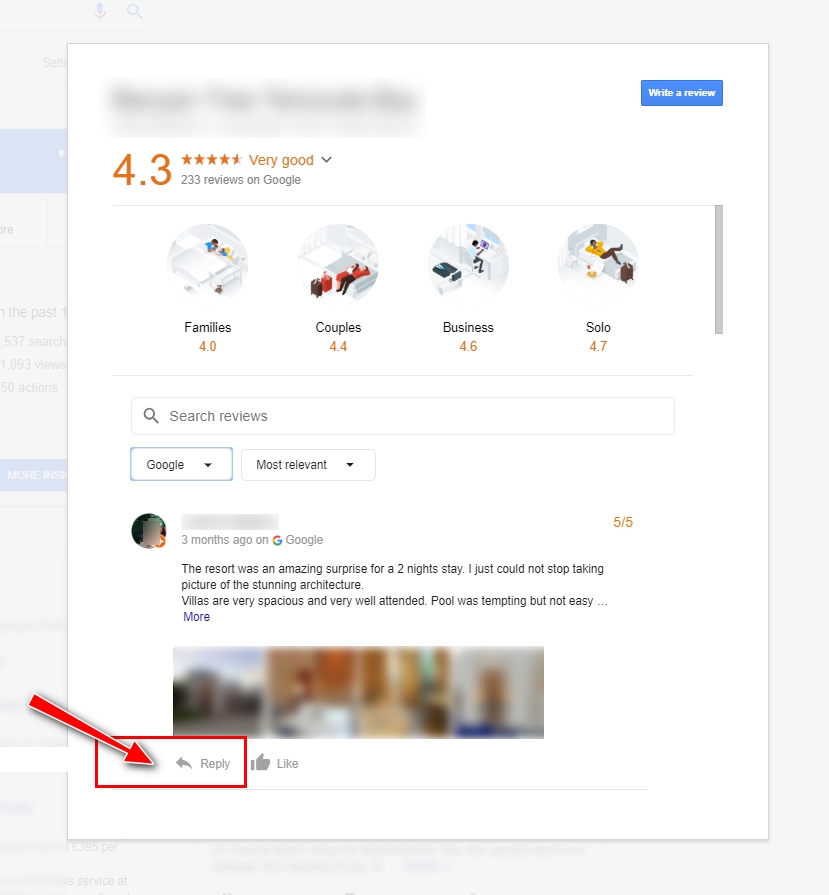
Reply Reviews
- You are now able to reply to all reviews, including those that are not visible on Google My Business.
6. Email Verification: Recipient cannot sign in using their email
Say you want to verify a location that you’ve added to your Manage Locations listing. You are using your Google My Business Agency account to send a verification email to your local branch, the current location owner.
But your local branch, as the email recipient, has received an email instruction to complete verification that asked them to log in using your agency account’s email address.
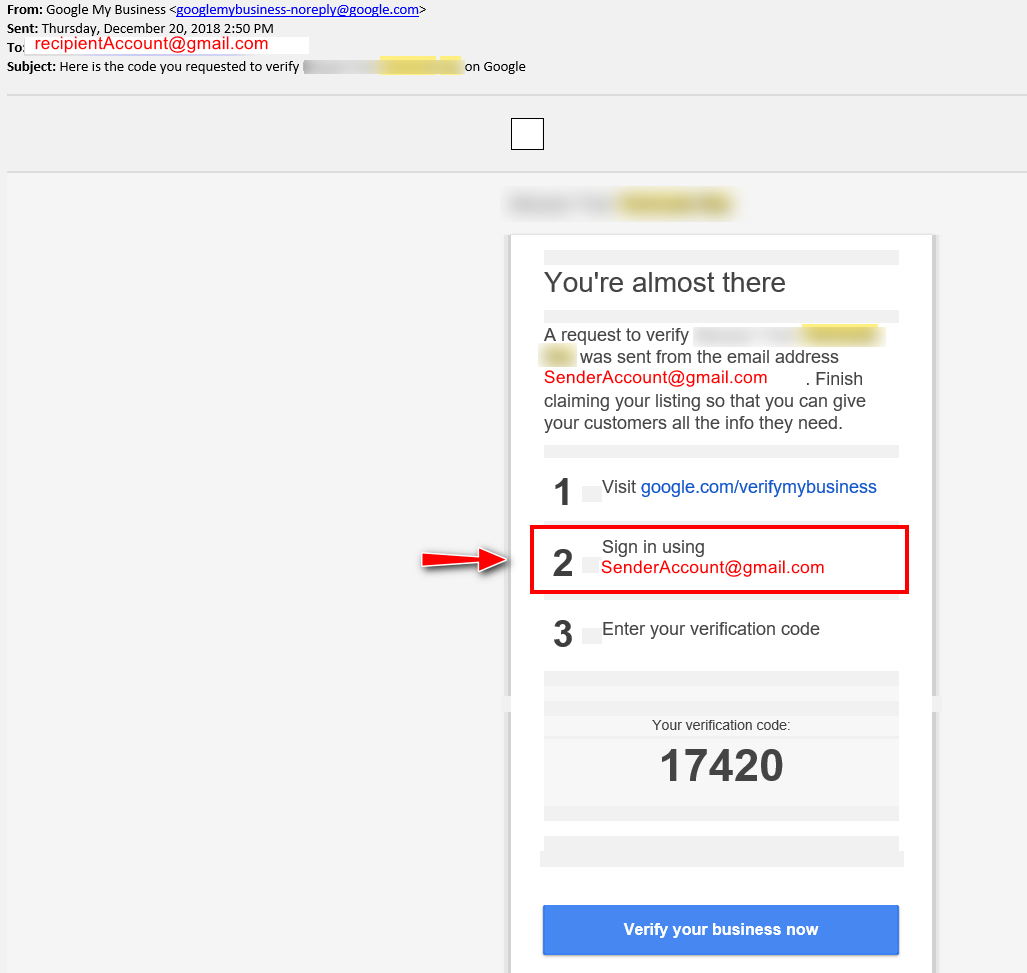
Email Received by the Recipient to Complete Verification
How to Fix the Issue
- Add your local branch, the verification email recipient, as a user of the location. Do this by going to the location’s page and clicking on the Users tab on the left-side navigation. For a step-by-step guide on how to add a user to a location, follow step three to eight in Issue 4.
- Once the email recipient has been successfully added as the location user, the person should be able to access the Google My Business platform.
- The email recipient should now be able to click on the link in the verification email and insert the verification code on Google My Business. Notice that your local branch can still proceed with verification using their email, even though the verification email asks them to log in using your email, the sender’s email, to verify.
***
This concludes our step-by-step guide on solving issues in Google My Business. As Google My Business is a significant SEO factor, helping you gain visibility across search opportunities, it’s imperative to ensure that it’s up-to-date, accurate, and relevant.
Need more help in managing your Google My Business listing?